When it comes to printing and the proper reproduction of images, size really does matter. There are two different ways to describe the size of a digital photograph.
The first is the traditional way, by its dimensions. 4″x5″ or 8″x10″ are typical, just like their real-world counterparts. The second is by file size, the amount of disk space the file takes up. Resolution affects file size, however, because an 8″x10″ photo at 300ppi (pixels per inch) is a larger file size than an 8″x10″ photo at 72ppi.
Therefore, when you “reduce” a photo in Photoshop, you can actually do one of three things:
1) Keep the resolution the same, but make the overall dimensions smaller.
You’ll need to use this option if, for example, you place a photo onto an InDesign page, and it’s HUGE. Don’t set the percentage in InDesign to 50% or less. It is unnecessary and can be technically problematic to have a gigantic photo imported into a picture box but scaled down to a small percentage. Instead, reduce the photo in Photoshop.
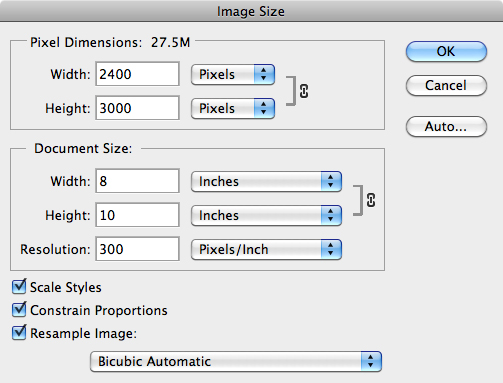
Here’s how to reduce a 300ppi 8″x10″ photo to, say, 4″x5″, but keep the ppi 300:
In Photoshop, go to the Image menu and select Image Size.
Click to enlarge
Keep the three checkboxes in the bottom left checked, as shown. Then change the Width or Height values under “Document Size” (currently 8″ and 10″ in the above example) to 4″x5″. You actually only need to change one dimension; the other will change automatically.
2) Keep the overall dimensions the same, but reduce the resolution.
You’ll need to use this option if you have a high-res photo or graphic that you want to use on a website, send via e-mail, use in a PowerPoint presentation, etc.
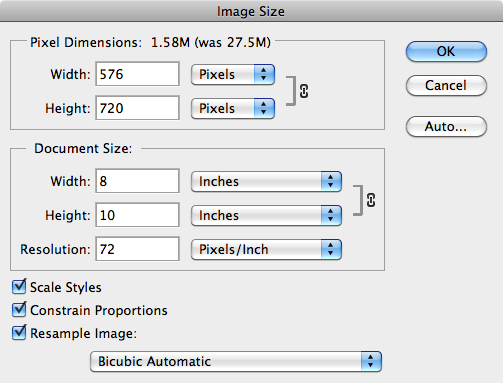
In this case, a 300ppi 8″x10″ photo is reduced to, say, 72ppi, but it remains 8″x10″. Here’s how:
In Photoshop, go to the Image menu and select Image Size.
Click to enlarge
Keep the three checkboxes in the bottom left checked, as shown. Then change the Resolution value under “Document Size” from 300 to 72 (shown changed to 72 in the above example). Note that the dimensions (8″x10″) remain, but the file size has been reduced from 27.5MB to 1.58MB.
3) Increase the resolution, but make the overall dimensions smaller.
You’ll need to use this option if you have a very large but low-res photo you want to use for offset printing. By increasing the dpi to 300 but allowing the image to get smaller in dimensions, you can safely import it into InDesign and know that it will print sharply.
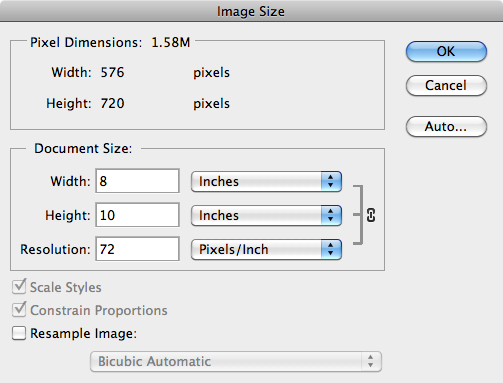
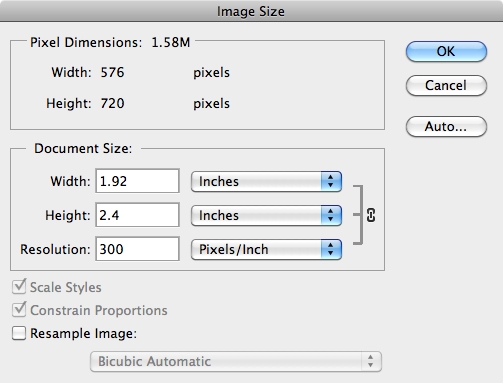
In this case, a 72ppi 8″x10″ photo is converted to 300ppi, but the dimensions are reduced to 1.92″x2.4″. Here’s how:
In Photoshop, go to the Image menu and select Image Size.
Click to enlarge
Uncheck the Resample Image box in the bottom left, as shown above. Then change the Resolution value under “Document Size” (shown as 72 in the example above) to 300 (shown in the example below). Note that the dimensions are reduced to 1.92″x2.4″ in order to compensate for the increase in resolution, but the file size (1.58MB) remains the same.
Click to enlarge
And one final thought about image size:
You can’t create image data out of thin air. Don’t use the above steps to enlarge an image a lot while trying to keep the resolution the same – Photoshop will obey your request, but the results beyond about 120% or 130% of the original size will look blurry, and print poorly.
About The Author